|
Classic and Collectable Cameras also: Zorki 4 & 4K |
 |

repair the fed 2
A closer look at the FED 2
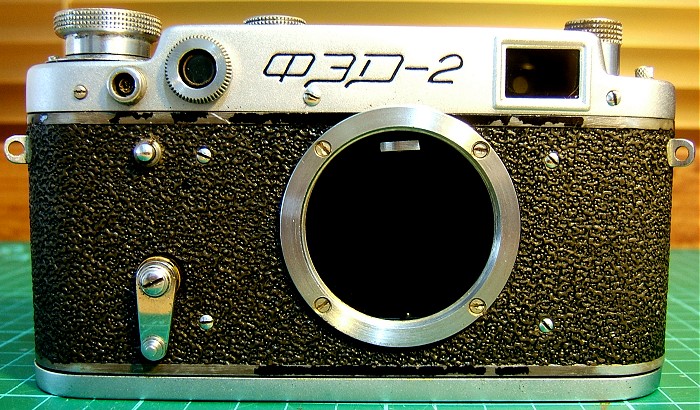
Believed by many to be the best FED of them all, the FED 2 replaced the FED 1, a true Leica clone.
With so many of these in need of serious TLC lets go right down to a curtain change. No bigger job on a FED 2! If you can handle that you can handle anything on this camera.
Before that though, I thought I might offer some tips and advice on spotting a good one from a bad one.
When buying online study the photos very carefully...then study them again! I've put tips below to help you spot the nightmares you may unwittingly buy (and haven't we all?) If the have-a-go brigade have been in there you may be wise to leave them alone. But that of course, is just in my opinion.Before we start, a couple of things:
1. The FED 2 has no cross head screws. If you see one it's not original.
2. Slotted screw heads need good screwdrivers, ones that cost more than $1 (£1)
3. Damaged screw slots are only caused by people who don't know what they are doing. A professional service or repair will leave little evidence (a little is to be expected.)
ld in the US, UK and Worldwide since 2004
Starting on the outside:
FED 2 |
||
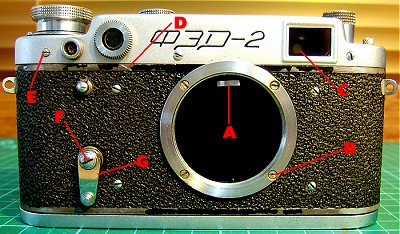
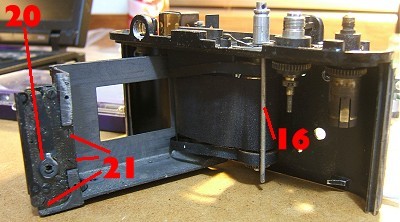
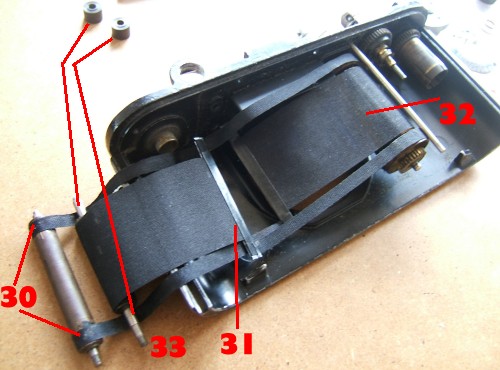
A The rangefinder lever should be clearly visible. In its free state it comes forward. If its inside the body it's almost certainly seized. It could still be seized at the front of course but that can't be spotted. B Damaged screw heads, not as serious as you may think. These short screws frequently come loose and hide nothing too nasty. Probably tightened by an owner without the right screwdriver. C Look for the 'eye' at the rear of the finder. If you can see it the lenses are still in place...the inner element can fall off and you'll have to go inside to sort it out. D Scratches round the rangefinder window. Usually means someone has tried (either successfully or not) to adjust the vertical alignment of the rangefinder image. Beware of this one, it could be a mess underneath. E Wrong screw? Could be just lost and replaced...but who has one to replace it? Most likely this camera has seen some repairs. F Damaged slot...unlikely as on this camera (unlike the Zorki) has a RH thread. G The self timer on the FED 2's usually points downwards when not set. Beware of faulty self timers, as I will show later it is a major repair to replace the timer. |
||
The challenge: To replace the shutter curtains. also: self-timer repair, rangefinder overhaul, viewfinder repair, in fact full strip!
|
||
| Getting started: Taking the lid off | ||
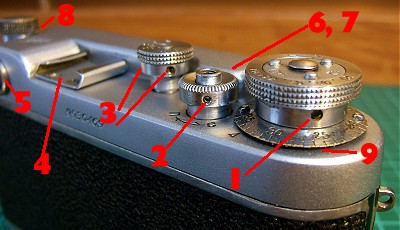
1 Fully wind on the shutter and unscrew this grub screw 2-3 turns. No need to remove this grub screw, just get it clear of the threads. Turn the winder knob anti-clockwise (CCW from now on) it will unscrew. Lay the parts out in the order you remove them, I find Pringles tops useful for storing parts (my excuse for eating Pringles) |
||
2 Move the shutter/rewind to 'C' loosen the grub screw fully, and remove this part. 3 Before loosening this shutter speed screws find a speed position where both screws are accessible. I usually loosen one, then lift and loosen the second. The dial will just pop off if you do that. Noting the speed that was set is up to you, I don't bother, I just find B by trial and error then screw it down. The reason I don't is because the amount we are going to do, it won't be where we left it anyway! 4 Remove 3 flash shoe screws. 5 Unscrew viewfinder bessel 6, 7 On the front, remove the three top plate screws and unscrew the rangefinder window bessel/brass with lens. 8 Lift the rewind shaft, remove the collar screw and bessel. Remove the rewind shaft. store parts: Note the collar needs to stay the right way up for refitting, they aren't all centered. 9 Remove the single screw on the top plate here.
A1: is left in place while removing the top-plate, it will slip off the spindle. Gentle work the top plate off (use a non metallic lever if required. I usually use hard plastic or wood. Never a screwdriver!) Tip: I have magnetised a couple of my small screwdrivers by drawing a magnet along the tip a few times. This really helps when removing/inserting these small, easily lost screws...especially grub screws. The rangefinder brass lens unit (7) may need a small drop of methylated spirit to loosen the thread, lacquer is used to fix these elements, so this loosens it.
Repairs to the viewfinder, rangefinder and actuation levers are all here. Also the top screws of the wind-on knob...which do work loose. A good observation here will tell you much about the shutter, its actuation and alignment. Much time, believe it or not, will be spent looking at what's here!
|
||
10: Remove the self timer lever by holding the lever and unscrewing. This is a RH thread and as far as I know a LH wasn't used on this model. 11: Remove the 4 chromed mirror box retaining screws. It is not necessary to remove the lens flange screws. 12: This is the speed shutter timer.
13: This is the diopter correction lens which moves forwards and backwards to focus. It is only held in place with a glass cement and is prone to working loose/falling off. If you are concerned...or it has fallen off refit it LATER with a suitable cement. I've used clear Nail Polish/Varnish in the past and it lasts! But remove the assembly before you do this...you will have to remove it soon anyway which is why I recommend doing it later on.
|
||
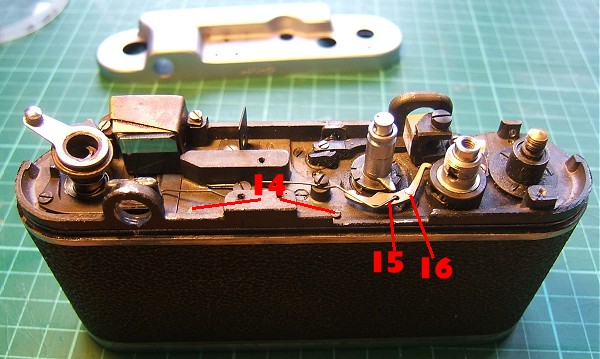
17: unscrew these 2 carefully, the retaining plate and shutter shield will fall out when these two are released. Remove the spring plate and BEWARE there is a short shaft next to the release rod that actuates the self timer DON'T LOSE IT remove it. 18: Remove both screws. 19: unlock a shaft of one blind roller by small turn anti-clockwise (CCW)...and while holding it still unscrew CLOCKWISE the locking nut which is a LH thread enough to let the tension off the blind roller spring. COUNT THIS BACK IN THE NUMBER OF TURNS until the spring goes slack. Shutter not cocked! Now repeat with the other one. 15: release this spring arm. 16: lift the shaft 5mm or so. 14: now remove these last two mirror box screws. THIS IS YOUR LAST CHANCE TO CHANGE YOUR MIND...ONCE YOU MOVE THE MIRROR BOX THERE IS NO GOING BACK 20: only now is the self-timer accessible! Told you it was hard to get to, didn't I! BEWARE of this spring stop, it is only held here under tension, I strongly advise you to CAREFULLY replace the self timer arm and screw now. 21: remove these screws only if you wish to remove/repair the self timer mechanism.
|
||
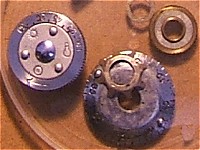
| A look at the self timer |
||
|
||
25: This is the cog that is stripped when the lever is forced! But not quite the end of the story. However, the self-timer of the Zenith E uses the same cogs and the same layout. There is a big difference with the cover plate (not compatible ) so you can't just swap them...sorry. But if you're prepared to take it apart you should be able to replace this damaged FED 2 cog. A further problem, damage to the clockspring anchor, can also be fixed with a little effort. I suspect the Zenith E spring will be very similar but I haven't tried it.
|
||
| The shutter blinds (focal plane, horizontal run) | ||
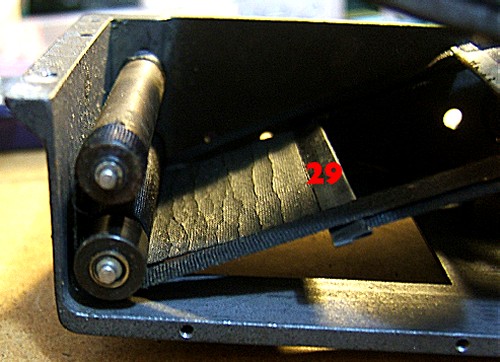
Well it's gone hasn't it. This blind leaked light very badly and would snap anytime. The added problem, as with any damaged blind, is that it doesn't wind-up or run smoothly. Accurate shutter speeds cannot be achieved and photographically they are useless. 29: This one has suffered from water damage, the curtain is brittle and perished. As soon as I touched it, it began to crumble. FED 2 Replacement blinds are straightforward to replace...if available? A Zenith E will provide a working replacement in this case.. AT THIS POINT AND BEFORE YOU GO ANY FURTHER, CONSIDER: Pondering on the thought of using non FED parts opens up a whole debate. My take on it goes something like this: If you wonder how I come to that conclusion, read on, if not skip the next bit. a) Western consumer goods deemed disposable on the basis of mass production/low cost (I still don’t understand why we accept such depreciation on cars?) marketing/sporting functions that make these goods desirable or a ‘must have’ rather than necessary or useful. Bought as a luxury for occasionally use, on the premise of being ‘useful’ in the long term, rather than a need basis. Repair of these items, occasionally preferred by the owner on a cost basis, than a full replacement. However, faulty/broken parts need be authentic factory parts to maintain an ‘integrity’ of the item . Hi tech Japanese cameras (such as the EOS range onward made most repairs uneconomical). Indeed the Canon ethic of the 1980’s demanded mass production to make any profit. These cameras where designed to be replaced not repaired, the principle of them being ‘disposable’ technology which need only last until the next technical development made them ‘obsolete’. In a capitalist consumer culture that’s how it works?
b) The Communist/Soviet system viewed its consumer goods very differently. Firstly, while accepting a level of consumerism, ‘desirability’ was not a good reason to buy. Secondly a camera would be expected to be a functional, robust and hard working tool. In addition at considerable cost pro rata it would be repaired constantly until it was beyond any service. More expensive original parts, where available, would only be used if absolutely necessary. Make-and-mend being an integral part of its life. So, when holding a genuine 50-year-old FED in your hands, that was/is a working camera and therefore not a pile of spare parts what are you holding? A factory serviced cherished personal possession that spent its life in the sun, or a hard working battle scarred functioning tool?
So here we go.
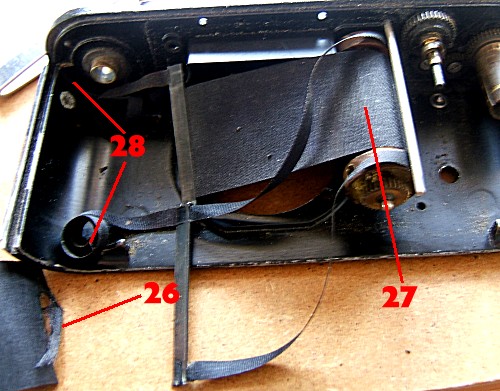
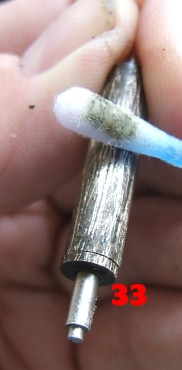
The Zenith E curtains are approx 5mm wider than the FED2 also the curtain metal strips are wider. However they are approx. the same length. From here I'm assuming your ability to handle these instructions and tools, give it some thought before you start. 28: I removed the ribbons from the roller 30 first, but it's up to you. 26: Firstly CAREFULLY and with a thin long blunt blade (I used a blunted Stanley knife blade) open the metal strip and remove the old curtain. Don't open the ends. 31: it should now look like this. 33: remove the old curtain from this roller REMEMBER THE DIRECTION IT WAS WOUND. Clean the gunk and old glue off 33 and glue the end of the new curtain to it. *This roller is sprung loaded and independent of the ribbons so the circumference and start position of the new curtain will have no effect. JUST GET IT CENTRED AND STRAIGHT
30: check the glue/condition of these ribbons now, just in case 32:2nd curtain more soon... |
||

 Oh...probably not as exciting as you'd thought?
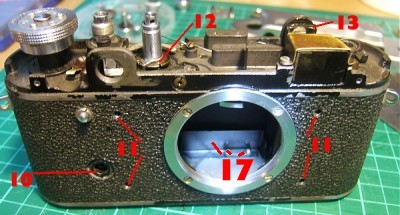 NOTE: I refit the wind on cranking knob at this stage to make life easier when cocking the shutter.
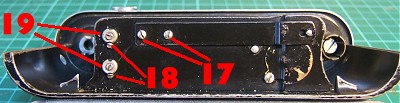
 The self timer unit is self contained, like most others on Russian cameras I have worked on. On this unit the teeth of this cog had sheared, rendering the unit useless.
 NIKON F
Solution for Photomic meter ftn. Olympus, Leica, Yashica, Pentax, Hassleblad, Gossen and 100's of others.
 USPS shipping US/Can/Japan/ Australia orders dispatched from US. US delivery approx. 3-5 days |
 Europe/UK orders please Click here |
|
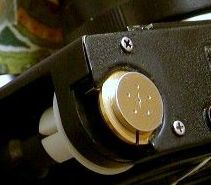 Customer's Leica cl with adapter fitted |
Also suits many, many: Cameras and Light Meters requiring PX625's Camerapedia.org: Cameras/Meters it fits
| NIKON F
Solution for Photomic meter ftn. |
 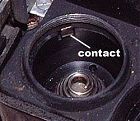 |
Use arubber grommet ? Not on a photomic ftn or cameras that need a metal to metal contact The top battery makes the + contact on the side of the battery compartment, so the battery casing must touch the side. Also the top must have a 'shelf' for the screw down top. |
Adapter Also fits Zinc Air: VT675, XL675, AP675, 675HPX 675A, R675ZA, 675AE, L675ZA AC675E, ME9Z, A675, DA675X ZA675, V675AT, DA675H, AC675 7003ZD, PR44, AC675E, V675A B900PA, DA675, 675HPX PR-675PA, PZA675 |
|
*There is no 100% replacement for the PX625 Mercury battery, nor will there ever be. Zinc Air were created to replace them |
|
|
*My adapter also allows air to pass between batteries. In 6 years no-one has indicated any problems.
|
 |
The adapter won't break, bend or fall off, GUARANTEED.They are tried and tested by 1000's of satisfied customers. |
www.paulbg.com |